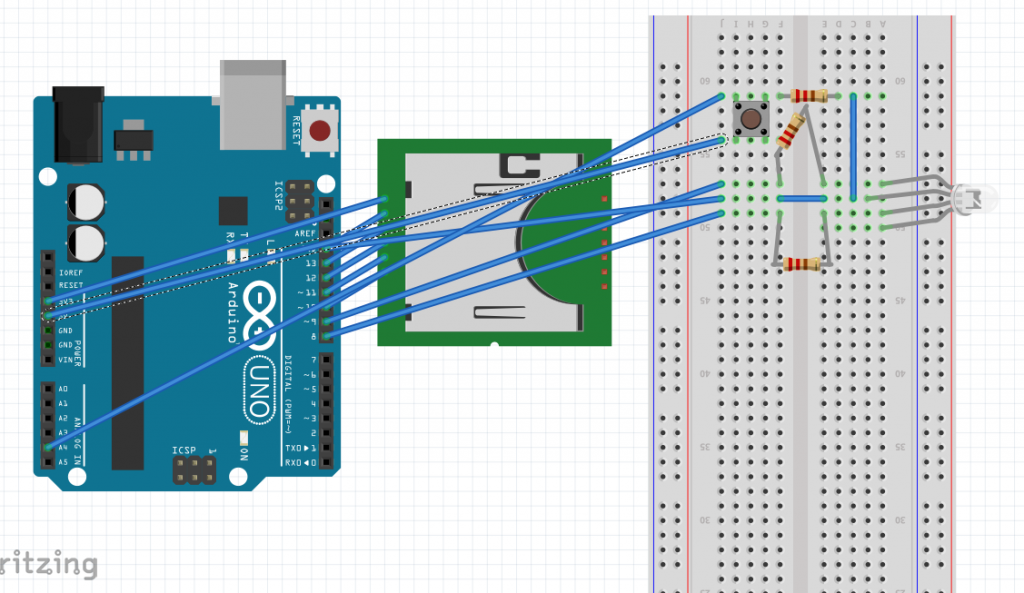
Arduino логгер на sd карту с безопасным извлечением и светодиодной индексацией записи..
Когда я воспользовался стандартным логером из примеров я заметил что файлы начинали биться я решил подправить немного логер и вот что получилось:
Поскольку нет у меня модуля RTS (модуля реального времени), то время считает сам мк. Для безопасного извлечения нажмите кнопку и дождитесь светодиода (один будет гореть). Если при старте горит только один то лог не ведется ( сбой при попытке записать или еще что то с картой ) …
/*

SD card datalogger
This example shows how to log data from three analog sensors
to an SD card using the SD library.
The circuit:
* analog sensors on analog ins 0, 1, and 2
* SD card attached to SPI bus as follows:
** MOSI — pin 11
** MISO — pin 12
** CLK — pin 13
** CS — pin 10
created 24 Nov 2010
modified 9 Apr 2012
by Tom Igoe
This example code is in the public domain.
*/
#include
// On the Ethernet Shield, CS is pin 4. Note that even if it’s not
// used as the CS pin, the hardware CS pin (10 on most Arduino boards,
// 53 on the Mega) must be left as an output or the SD library
// functions will not work.
const int chipSelect = 10;
long previousMillis = 0;
int sek=0;//значение секунд
int mins=0;//значение минут
int chas=0;//значение часов
void set_pl(int l){
if(l==0) {
digitalWrite(8, LOW);
digitalWrite(9, LOW);
}
if(l==1) {
digitalWrite(8, HIGH);
digitalWrite(9, LOW);
}
if(l==2) {
digitalWrite(8, LOW);
digitalWrite(9, HIGH);
}
if(l==3) {
digitalWrite(8, HIGH);
digitalWrite(9, HIGH);
}
if(l>3) {
digitalWrite(8, LOW);
digitalWrite(9, LOW);
}
}
File dataFile ;
void setup()
{
pinMode(8, OUTPUT);
pinMode(9, OUTPUT);
set_pl(0);
// Open serial communications and wait for port to open:
Serial.begin(9600);
while (!Serial) {
; // wait for serial port to connect. Needed for Leonardo only
}
Serial.print(«Initializing SD card…»);
// make sure that the default chip select pin is set to
// output, even if you don’t use it:
pinMode(10, OUTPUT);
// see if the card is present and can be initialized:
if (!SD.begin(chipSelect)) {
set_pl(2);
Serial.println(«Card failed, or not present»);
// don’t do anything more:
return;
}
set_pl(1);
Serial.println(«card initialized.»);
dataFile = SD.open(«datalog.txt», FILE_WRITE);
}
void loop()
{
if( analogRead(A4) >800 ){
//File dataFile = SD.open(«datalog.txt», FILE_WRITE);
if (dataFile) {
dataFile.println(«Stop record.»);
dataFile.close();
// print to the serial port too:
Serial.println(«Stop record.»);
}
digitalWrite(chipSelect, LOW);
while(true){
set_pl(0);
delay(500);
set_pl(1);
delay(500);
}
}
if (millis() — previousMillis >1000)
{
Serial.println(millis());
previousMillis = millis(); //запучкаем таймер
sek++;
if(sek>59)//если переменная секунда больше 59 …
{
sek=0;//сбрасываем ее на 0
mins++;//пишем +1 в переменную минута
}
if(mins>59)//если переменная минута больше 59 …
{
mins=0;//сбрасываем ее на 0
chas++;//пишем +1 в переменную час
}
if(chas>23)//если переменная час больше 23 …
{
chas=0;//сбрасываем ее на 0
}
}
// make a string for assembling the data to log:
String dataString = «»;
if(chas<10)
dataString+=»0″;
dataString +=chas;
dataString +=»:»;
if(mins<10)
dataString+=»0″;
dataString +=mins;
dataString +=»:»;
if(sek<10)
dataString+=»0″;
dataString +=sek;
dataString +=» : «;
// read three sensors and append to the string:
for (int analogPin = 0; analogPin < 3; analogPin++) {
int sensor = analogRead(analogPin);
dataString += String(sensor);
if (analogPin < 2) {
dataString += «,»;
}
}
// open the file. note that only one file can be open at a time,
// so you have to close this one before opening another.
// if the file is available, write to it:
if (dataFile) {
set_pl(3);
dataFile.println(dataString);
// dataFile.close();
// print to the serial port too:
Serial.println(dataString);
}
// if the file isn’t open, pop up an error:
else {
Serial.println(«error opening datalog.txt»);
while(true){
set_pl(0);
delay(500);
set_pl(2);
delay(500);
}
}
set_pl(1);
}
Февраль 7, 2015 Суббота at 8:46 пп


